Showing posts with label IT tips. Show all posts

Tuesday, July 3, 2018

Office Furniture You Can Build Yourself

Office Furniture You Can Build Yourself


We don’t know about you, but the office is our favourite room in the house. It’s snug, quiet and has everything we need to get on with what we love. The best thing about a great office is good, solid furniture. Is there anything better than a heavy, mahogany desk? If you’re a neat freak like us, then you’ll want everything filed and stored away correctly too. That means investing in good quality shelving, cabinets and storage units.

Or does it? Not every piece of office furniture has to cost a fortune. In fact, much of it can be built yourself. If you’ve got a free weekend and a burning desire to build things, you can make your own. Your office will be even homelier if you fill it with homemade furniture. Let’s get started and take a look at the office furniture that you can build yourself.

Desk - Building your own desk seems like a mammoth task. It will be large, heavy and powerful in the room. However, they’re actually not so difficult to build. The hardest part will be finding the perfect piece of wood for the main section. If you’re struggling with the initial design, try searching for woodworking plans for beginners. They provide detailed drawings for you to work to. That way, you’re less likely to make a big mistake and you’ll build some experience.

Chair - A chair will be a little more difficult than the desk. Although it’s smaller, it has more fiddly parts to piece together. It will also need to hold a load on a much smaller scale. This will test your intricate skills, but will be well worth it. Find a solid piece of wood for the main part of the seat, then use a saw to cut equal length legs. You’ll need to piece it all together carefully with a sturdy back support.

Shelving - We thought we’d throw a nice easy one into the mix. Shelves are super simple and easy to put up, even for the DIY novices amongst us. A shelf was the first thing we ever built in our home and we’ve never looked back! Cut the appropriate length of wood and finish it with a good sanding and varnish. Get your hands on a pair of wall brackets and drill it all together. Simple!

Storage cabinets - If you’re anything like us, you’ll have tons of documents lying around. What you need are sturdy storage cabinets to hold everything. These are simple box elements that can be put together quite easily with the right tools. The tricky part will be getting the drawers to flow smoothly. However, the right bits of equipment will work wonders here. The best thing about building these yourself is that you can create a bespoke storage unit. You can build it to fit the exact size and space of your office.

There’s nothing on this list that couldn’t be built by a beginner with a little hard work. The first step is setting your mind to it. After that it’s all about planning correctly and getting your hands on the right tools. Good luck!

Friday, June 29, 2018

"The Studio" - now on Facebook


Over the last few months I realized that I have been accumulating a good number of  photographs of interior work - both ongoing and finished, on my phone and nearly none had found their way to this blog. The prime culprit - the thought that I will "one day" get a good photographer to cover "finished" interiors of the entire project/s and then put the best ones out here .... a "one day" that is yet to come :(

There is a lot that pictures communicate, not just how good (or bad) the interiors look but also insight into what goes into creating good designs - thus initiating and invigorating the viewers' own thoughts & ideas. What I also found was that while the western world has its  Houzz.com's and other websites, there is hardly ANY place that has insight into home interiors in the Indian context...let me explain what that means.

As Indians our needs are fairly unique and these need to be factored in while designing homes - things such as gas cylinders in the kitchen, a place for storing slippers in the foyer and a provision for people to sit and put their shoes on, false ceilings that need to take care of accommodating the ceiling fan (ask a westerner what a ceiling fan is and watch his expression), storage spaces in the kitchen for lines of boxes containing different spices - the small - small boxes that we have quite similar to the ones in the paan shop :), the puja unit, the jhoola in the living room... I could keep going on and on but I guess you get what I mean by design in an "Indian" context.

So back to the point - if you look around for ideas and pictures of designs that cater to our Indian needs you will hardly find much on the Internet. The facebook page of The Studio is an attempt to fulfill that exact gap - apart from getting all those photographs out from my phone that is :). It is also a forum I am experimenting with for a more continuous interaction with my readers (you).

I will be glad if you visit the page (it's at https://www.facebook.com/homedesignbangalore) and give me your feedback - a "like" if you like it or a comment if you see something amiss and want it added. Just be a little considerate as the content on the page is only what was added this afternoon after the page was created. Based on your feedback it will grow over time.

While it's said that a picture says a thousand words, sometimes those thousand words need to be written down for the best impact. Therefore this blog will continue to be THE medium for exchanging thoughts, questions & ideas. The Facebook page will serve as a medium of conveying some of those ideas through pictures. And both this blog and the Facebook page will interlink to bring you the best of each. Also, if YOU have any picture that conveys a unique idea/ thought or lifestyle then do please share and I will be more than happy to put that up ... just ensure that it is not copyrighted.

As always will welcome your feedback

Saturday, January 20, 2018

Cara Memasang Admob di Android Studio

Cara Memasang Admob di Android Studio


Cara Memasang Admob di Android Studio – AdMob merupakan perusahaan iklan seperti Google Adsense, akan tetapi admob dikhususkan untuk iklan di mobile. Admob didirikan oleh Omar Hamoui tahun 2006 yang lokasinya di San Mateo California. Sekitar bulan november 2009 admob dibeli oleh Google. Jadi saat ini admob merupakan salah satu layanan dari Google. Fungsi admob ini hampir sama dengan Google adsense yaitu untuk melayani periklanan baik advertaiser atau publisher. Buat kamu yang sudah berkecimpung di Google Adsense akan mudah memahaminya.
Buat kamu developer aplikasi android yang ingin mempunyai penghasilan, maka harus memasang kode iklan admob di aplikasi android. Pemasangan iklan admob berbeda dengan pemasangan iklan google adsense yang tinggal copy paste di Widged. Untuk pemasangan iklan admob kita harus mengatur beberapa kode supaya iklan bisa tampil.
Buat yang belum punya akun Admob sebaiknya baca dulu “Cara Daftar Admob Langsung Diterima“

Berikut ini langkah-langkah Cara Memasang Admob di Android Studio :

  1. Pastikan Google Repository sudah terinstall di android SDK Manager
cara-memasang-admob-di-android-studio
2. Memanggil Google Repository ke dalam aplikasi. Caranya buka Gradle lalu tambahkan kode
compile ‘com.google.android.gms:play-services-ads:9.4.0’
Lihat gambar supaya lebih jelas. Jangan lupa klik “Sync Now” untuk menyinkronkan kode.
cara-memasang-admob-di-android-studio-2
3. Buka string di NamaAplikasiKalian/app/src/main/res/values/strings.xml . Lalu tambahkan kode
“<stringname=”banner_ad_unit_id”>ca-app-pub-3940256099942544/6300978111</string>” 
Ini nantinya berfungsi untuk menambah iklan banner. Sedangkan untuk iklan interstitial akan langsung dipasang di MainActivity.
cara-memasang-admob-di-android-studio-3
4. Buka activity_main.xml lalu edit dan tambahkan kode
 xmlns:ads=”http://schemas.android.com/apk/res-auto”
dan kode
<com.google.android.gms.ads.AdView
android:id=”@+id/adView”
android:layout_width=”wrap_content”
android:layout_height=”wrap_content”
android:layout_centerHorizontal=”true”
android:layout_alignParentBottom=”true”
ads:adSize=”BANNER”
ads:adUnitId=”@string/banner_ad_unit_id”>
</com.google.android.gms.ads.AdView>
Untuk lebih jelas lihat gambar di bawah ini
cara-memasang-admob-di-android-studio-4
5. Sekarang buka MainActivity.java lalu
Di atas Overide tambahkan
private InterstitialAd interstitial;
bagian import tambah kode
import com.google.android.gms.ads.AdRequest;
import com.google.android.gms.ads.AdView;
import com.google.android.gms.ads.AdListener;
import com.google.android.gms.ads.InterstitialAd;
Lalu tambahkan kode di bawah SetContentView seperti berikut ini
interstitial = new InterstitialAd(MainActivity.this);
interstitial.setAdUnitId(“kode iklan interstitial“);
AdView mAdView = (AdView) findViewById(R.id.adView);
AdRequest adRequest = new AdRequest.Builder().build();
mAdView.loadAd(adRequest);
interstitial.loadAd(adRequest);
// Prepare an Interstitial Ad Listener
interstitial.setAdListener(new AdListener() {
public void onAdLoaded() {
// Call displayInterstitial() function
displayInterstitial();
}
});
public void displayInterstitial() {
// If Ads are loaded, show Interstitial else show nothing.
if (interstitial.isLoaded()) {
interstitial.show();
}
}
Untuk lebih jelas kode full di MainActivity.java seperti di bawah ini
package com.viainformasi.iklanadmob;

import android.support.v7.app.AppCompatActivity;
import android.os.Bundle;
import com.google.android.gms.ads.AdListener;
import com.google.android.gms.ads.AdRequest;
import com.google.android.gms.ads.AdView;
import com.google.android.gms.ads.InterstitialAd;

public class MainActivity extends AppCompatActivity {

    private InterstitialAd interstitial;

    @Override
    protected void onCreate(Bundle savedInstanceState) {
        super.onCreate(savedInstanceState);
        setContentView(R.layout.activity_main);

        interstitial = new InterstitialAd(MainActivity.this);
        interstitial.setAdUnitId("kode iklan interstitial");
        AdView mAdView = (AdView) findViewById(R.id.adView);
        AdRequest adRequest = new AdRequest.Builder().build();
        mAdView.loadAd(adRequest);
        interstitial.loadAd(adRequest);

        // Prepare an Interstitial Ad Listener

        interstitial.setAdListener(new AdListener() {

            public void onAdLoaded() {

                // Call displayInterstitial() function

                displayInterstitial();

            }

        });

    }

    public void displayInterstitial() {

        // If Ads are loaded, show Interstitial else show nothing.

        if (interstitial.isLoaded()) {

            interstitial.show();

        }

    }
}
Jangan lupa tambahkan kode program di AndroidManifest.xml
<?xml version="1.0" encoding="utf-8"?>
<manifest xmlns:android="http://schemas.android.com/apk/res/android"
    package="com.viainformasi.iklanadmob">

    <!-- Include permission untuk Google Mobile Ads-->
    <uses-permission android:name="android.permission.INTERNET"/>
    <uses-permission android:name="android.permission.ACCESS_NETWORK_STATE"/>
    <application
        android:allowBackup="true"
        android:icon="@mipmap/ic_launcher"
        android:label="@string/app_name"
        android:supportsRtl="true"
        android:theme="@style/AppTheme">
        <!--meta-data tag yang diperlukan untuk menggunakan Google Play Services.-->
        <meta-data android:name="com.google.android.gms.version"
            android:value="@integer/google_play_services_version" />
        <activity android:name=".MainActivity">
            <intent-filter>
                <action android:name="android.intent.action.MAIN" />

                <category android:name="android.intent.category.LAUNCHER" />
            </intent-filter>
        </activity>

        <!--memasukan elemen Activity dengan atribut configChanges dan theme-->
        <activity android:name="com.google.android.gms.ads.AdActivity"
            android:configChanges="keyboard|keyboardHidden|orientation|screenLayout|uiMode|screenSize|smallestScreenSize"
            android:theme="@android:style/Theme.Translucent" />
    </application>

</manifest>


kata kunci :

mencari uang di internetmencari uang di internet 2018mencari uang di internet terbarumencari uang di internet tanpa modal, mencariuang di internet untuk pemulamencari uang di internet dengan cepatmencariuang di internet androidmencari uang di internet kaskusmencari uang diinternet 2017mencari uang di internet 2016mencari uang di internet denganpaypalmencari uang di internet gratismencari uang diinternet dengan mudahmencari uang di internet tanpa rekeningmencari uang di internet bagi pemula,mencariuang di internet halalcari uang di internet tanpa modalcari uang diinternet gratis , cari uang di internet 2016cari uang di internet lewat hpcari uang di internet androidcari uang di internet dengan androidrahasiacari uang di internet akhirnya terungkapcara mendapatkan uang di internetandroidcari uang di internet lewat androidcara cari uang di internetandroidcara mendapatkan uang di internet asliaplikasi pencari uang diinternetcara mencari uang di internet dengan androidmendapatkan uang dariinternet androidcari uang lewat internet androidmenghasilkan uang dariinternet androidcara mencari uang di internet dengan menulis artikelcariuang di internet bagi pemulacara mencari uang di internet bagi pemulacaramencari uang di internet bagi pelajar, cari uang di internet tanpa bayarcaramendapatkan uang di internet bagi pemulacara mendapatkan uang di internetbagi pelajarcari uang di internet tanpa blogcari uang di internet lewatblogmencari uang bermodal internetbagaimana mencari uang di internetbelajarmencari uang di internetcara mencari uang di internet lewat blogbisnismencari uang di internet, buku mencari uang di internetcara mencari uang diinternet dengan blogcara mudah mendapatkan uang di internet bagi pemulamenghasilkan uang bermodal internetmenghasilkan uang dari internet bagipelajarmendapatkan dollar dari blogmendapatkan dollar dari internet.

Friday, November 24, 2017

Cara Remote Komputer Menggunakan Smartphone Android

Cara Remote Komputer Menggunakan Smartphone Android


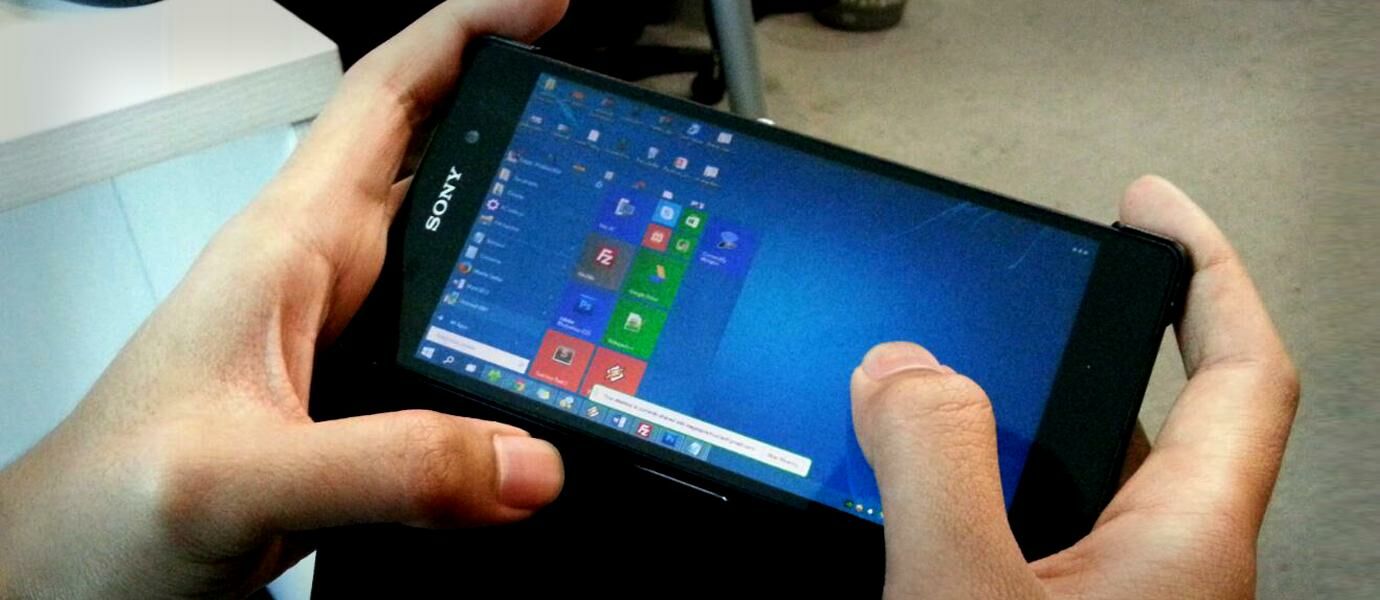
Apakah kamu sudah tau, kalau Android ternyata juga bisa melakukan remote pada komputer desktop loh. Kalau di PC lebih dikenal dengan Remote Desktop menggunakan TeamViewer, nah untuk Android, Google telah membuat sebuah aplikasi yang bernama Chrome Remote Desktop.
Seperti kita ketahui, setiap aplikasi atau produk yang dikeluarkan Google selalu terkenal dengan kualitasnya, tak terkecuali aplikasi Chrome Remote Desktop. Kamu bisa mengendalikan Komputer kamu hanya dengan bermodalkan Smartphone Android, dan tentunya tidak lambat.
Langkah persiapan:
  • Sebuah Akun Google
  • Sebuah Komputer PC/Laptop
  • Sebuah Smartphone Android (dengan OS Android minimal 4.0 Ice Cream Sandwich)
Langkah pengerjaan:
  • Download dan Install Google Chrome terbaru di Komputer kamu
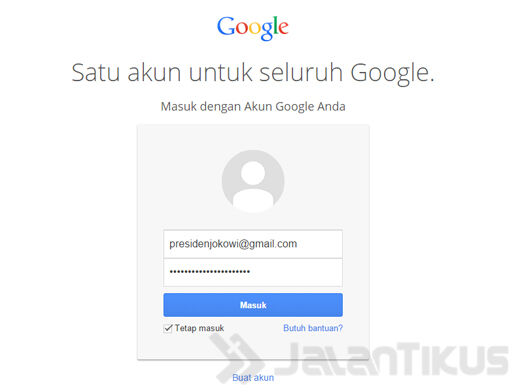
  • Kemudian Login di Google Chrome menggunakan Akun Google kamu
  • Jika sudah, sekarang Install Chrome Remote Desktop Extension untuk Google Chrome kamu
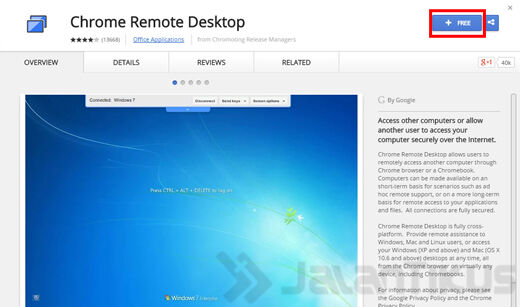
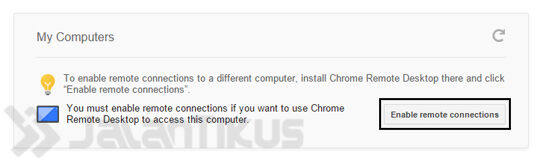
  • Setelah install, Jalankan Ekstension tersebut. Maka akan nampak sebuah halaman, cari dan klik tombol yang bertuliskan Enable remote connections.
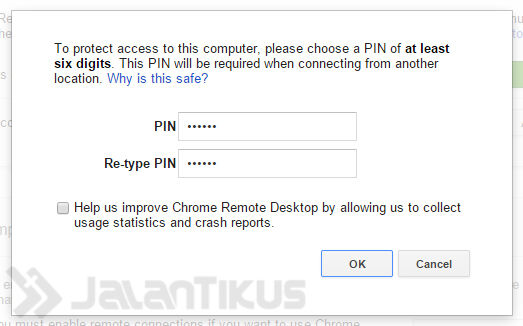
  • Maka kamu akan ditanya untuk memasukan PIN, Silahkan masukan PIN berupa angka dan terdiri dari 6 karakter.
  • Jika diminta masukan PIN lagi, masukan saja PIN yang tadi kamu buat
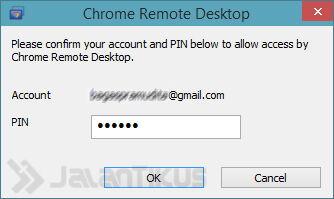
  • Oke, sampai disini pengaturan yang kamu lakukan sudah selesai. Sekarang tinggal Install software yang bernama Chrome Desktop Remote Host di Komputer kamu. Software ini berfungsi untuk menghubungkan Komputer kamu dengan si Android.
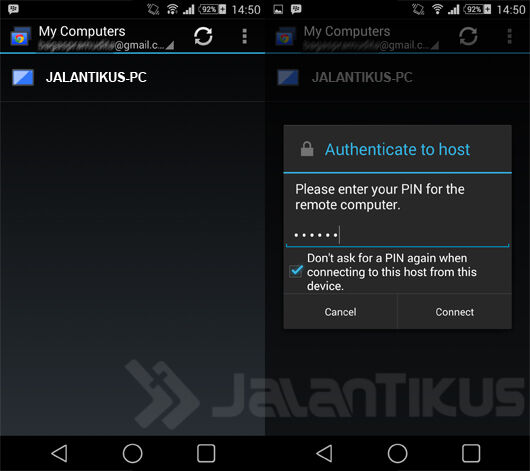
Jika sudah Install, Sekarang Install lagi aplikasi Androidnya, yaitu Chrome Remote Desktop
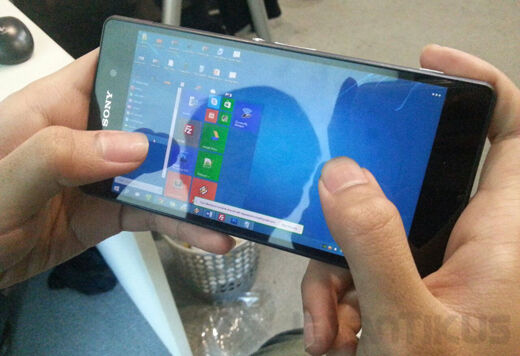
Nah, jika tahap-tahap diatas kamu lakukan dengan benar, maka akan muncul nama komputer yang bisa kamu remote, jika belum muncul, coba klik tombol refresh.
Jika sudah berhasil tersambung, coba aktifkan mode "Auto rotate", agar bisa menggunakan mode Landscape.
Selesai!
Sebenarnya kamu juga bisa menggunakan Teamviewer for Android, hanya saja, kelebihan aplikasi bawaan Google adalah terintegrasi dengan Akun Google kamu dan akses yang sangat cepat, kamu tidak perlu lagi merasakan lag-lag ketika melakukan Remote Desktop, itulah hebatnya Google!


kata kunci :

mencari uang di internetmencari uang di internet 2018mencari uang di internet terbarumencari uang di internet tanpa modal, mencariuang di internet untuk pemulamencari uang di internet dengan cepatmencariuang di internet androidmencari uang di internet kaskusmencari uang diinternet 2017mencari uang di internet 2016mencari uang di internet denganpaypalmencari uang di internet gratismencari uang diinternet dengan mudahmencari uang di internet tanpa rekeningmencari uang di internet bagi pemula,mencariuang di internet halalcari uang di internet tanpa modalcari uang diinternet gratis , cari uang di internet 2016cari uang di internet lewat hpcari uang di internet androidcari uang di internet dengan androidrahasiacari uang di internet akhirnya terungkapcara mendapatkan uang di internetandroidcari uang di internet lewat androidcara cari uang di internetandroidcara mendapatkan uang di internet asliaplikasi pencari uang diinternetcara mencari uang di internet dengan androidmendapatkan uang dariinternet androidcari uang lewat internet androidmenghasilkan uang dariinternet androidcara mencari uang di internet dengan menulis artikelcariuang di internet bagi pemulacara mencari uang di internet bagi pemulacaramencari uang di internet bagi pelajar, cari uang di internet tanpa bayarcaramendapatkan uang di internet bagi pemulacara mendapatkan uang di internetbagi pelajarcari uang di internet tanpa blogcari uang di internet lewatblogmencari uang bermodal internetbagaimana mencari uang di internetbelajarmencari uang di internetcara mencari uang di internet lewat blogbisnismencari uang di internet, buku mencari uang di internetcara mencari uang diinternet dengan blogcara mudah mendapatkan uang di internet bagi pemulamenghasilkan uang bermodal internetmenghasilkan uang dari internet bagipelajarmendapatkan dollar dari blogmendapatkan dollar dari internet.

close
Banner iklan disini